| |
Gainclone Power Amplifier LM3886 |
|
In this application, we are building a gaincard like amplifier. This application type is named gainclone in the audio world. To take a satisfactory audio response, we are adding a Linkwitz equaliser to the feedback line and adding bass compensation also.
We are using LM3886 which is the revised version of its brother LM3875. These are the parameters that we are interested in. Honestly this values are much more better than many of HI-FI amplifiers sold in the market. Especially it is hard to find 110dB signal to noise ratio. And another property is, when there is no input, this amplifier is quite like a dead. It is nearly impossible to hear any noise when you stick your ear to the speakers.
We will do our application, Gain Card, a similar application. Gain to the world of DIY audio applications, this type of clone is called the Gain Card clone. Give a satisfactory answer to the application for audio feedback to add the bass line, a simple compensation Linkwitz apply equalization.
Integrated LM3875'in'll use the new revised one of his brothers LM3886 is.
Maximum output power: 68W RMS - 108W Peak (Peak)
THD: 0.03% @ 60W
SNR: 110dB @ 60W - 92.5 dB @ 1W
PSRR: 120dB
Protection Circuits: DC / AC Short circuit protection, Thermal protection
Output Class: Conjugate EU-A
What interests us are the parameters. Clearly, the market values are given in the table kind of contact HI-FI amplifiers toplatacak horseshoes. Especially 110dB signal to noise ratio is very easy to see in the market. Briefly summarize, this amp If you set up like the man, when the energy giant kolonlarınızı (in the colossal multi-use) of any hiss in your ear yapıştırsanız, Tiss, hırr duyamayacaksınız tone, all the way up to the entrance of takıncaya something. In other words, this amplifier, when the signal at the entrance to a dead silent. On the other hand, even when running continuously at full power when using the recommended group of speakers is likely to hear distortion. Better yet apricot candlestick:)
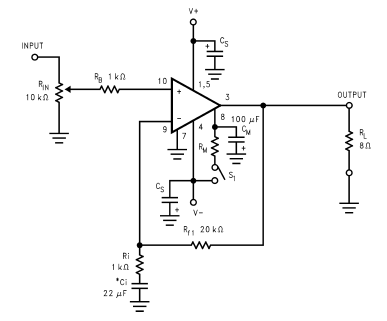
Let us come to the circuit diagram .. National Semiconductors engineers proposed the following basic application circuit.
As we have seen a circuit diagram is quite simple and feasible. In fact, we did not make any changes to the signal line. That did not add noise to the system. Rin input level potentiometer in the circuit, current limiting resistance Rb, and Ri gain resistors RF1. In this application, 20K/1K = 21vv (26.4 dB), gain is achieved. 22μF capacitor is the feedback gain health by providing the start of the curve ~ 7 Hz frequencies six-speaker sound transmission barriers.
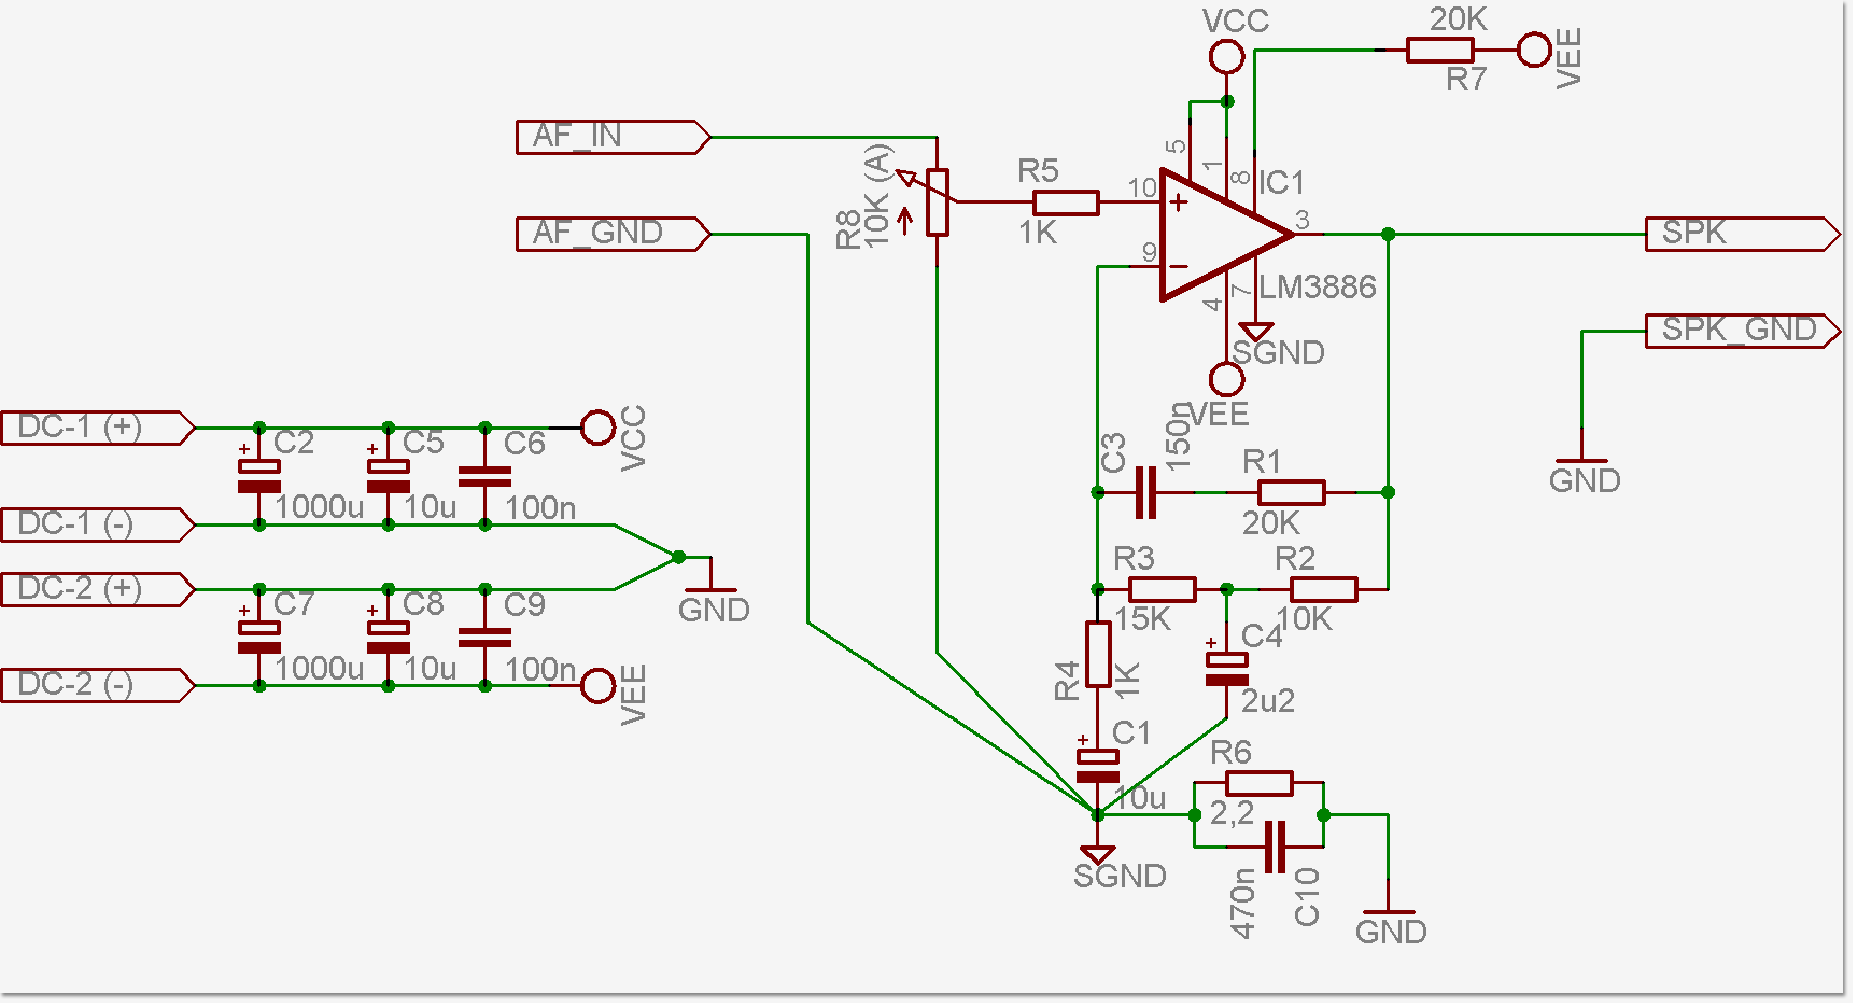
Our application is as follows;
As we have seen negative feedback line has been drastically revised. Thus, the band 30Hz-70Hz ~ 30Hz peak was obtained at a gain of 7dB ~ 34dB arrested. Dear friend Nico Ras, this circuit is designed in conjunction with application of 16 or 20cm wide and 10-15 liter closed cabinets (sealed box) placed the bass speakers are starting to fall is usually around 70-80Hz eğirilerini respond very well tolerated by the slaughter of around 40-50Hz frequency (F3 ) provides. Very high quality small subwoofers that this neighborhood F3 2 +1 if we think we know why. However, the real deep bass (20Hz), seeking friends (including myself) a very powerful addition to an active subwoofer for this system to design the future. 26v DC supply and 4 ohm speakers with a given application schema 2Vpp input signal is applied to produce an average 65W RMS power. 8ohm speaker to use the supply voltage for friends + / - attracted up to 38v. Of course, these values can also be used under the tensions.
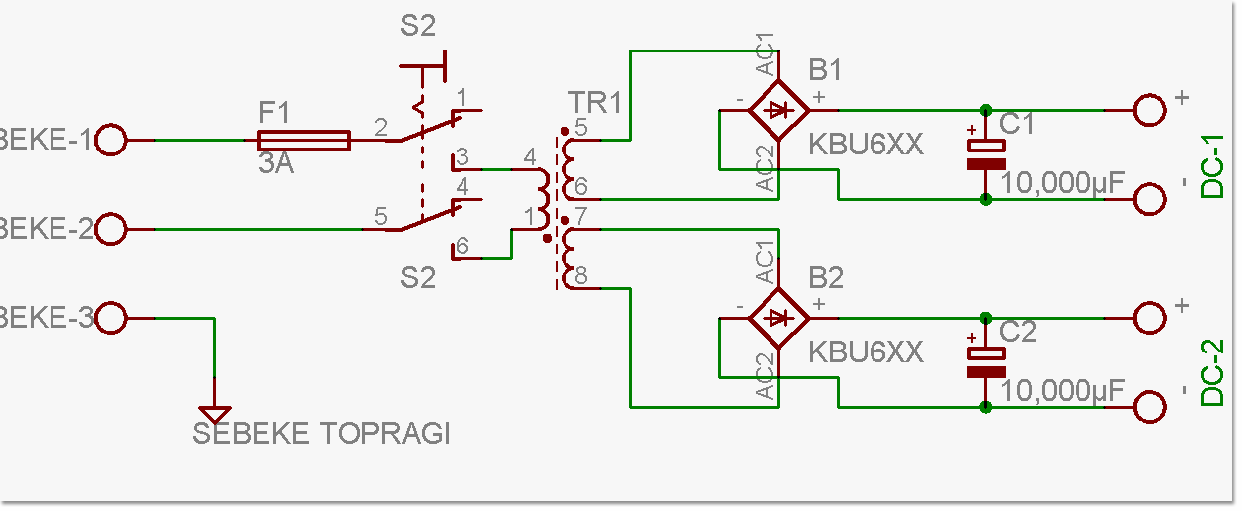
Supply circuit is also very simple;
As we have seen a double sekonderli transformer, two KBU 6 series (6 amps), and 2 10.000 inductance diode bridge health "father" consists of condenser. As a general rule 2.200 inductance per ampere is seen sufficient stabilization capacitor HI-FI applications, the use of specific pieces of the inductance was 4.700 per ampere. An average of 2 amps per line inductance is determined to capture the mind, 10.000 party mode (constant power of 80% and above) for friends to use two pieces per line inductance is recommended to use 10.000.
If the next issue of transformer, toroidal transformer is used in general applications, HI-FI. This type transformers expensive (60-80 €) and very space-saving assets. Advantages of magnetic flux leakage is low and therefore easily yerleştirilebilmesidir amplifier the same box. We amplifikatörümüzü preferably two separate boxes and kept in trafomuzu trafolarla our business we will see the EI-type standard. Transformer data must be at least as follows;
- 8 ohms is standard practice for the 220 / 2 x 24v (mid-end of the ayırılacak) at least 250W health,
- 8 ohms for party mode 220 / 2 x 24v (mid-end of the ayırılacak) at least 350W health,
- 4 ohms is standard practice for the 220 / 2 x 18V (mid-end of the ayırılacak) at least 250W health,
- 4 ohms for party mode 220 / 2 x 18V (mid-end of the ayırılacak) at least 350W health,
Why do we need of what the forces on the transformer if you have selected will be analyzed; 68W RMS output power factor of at least 20% will be added instantaneous peak value is obtained if the 81W, 60% yield amplifikatörümüz working class in the meantime the EU will attract at least 135W. When you wake up at the same time to make this job a two amplifiers 270W power supply is needed. So actually, even less than 250W. However, listeners generally normal to a health 2x20W 250W power will use the health trafomuz worry will meet our needs. On the other hand the party mode, so at least 55W per channel continuous power is pulled ness and hard rock music with the rhythm of the peaks to 60% when i force the power to need 180W per channel. Naturally, such an environment, both the transformer and circuits, "cold" will keep the purity wait.
APPLICATION:
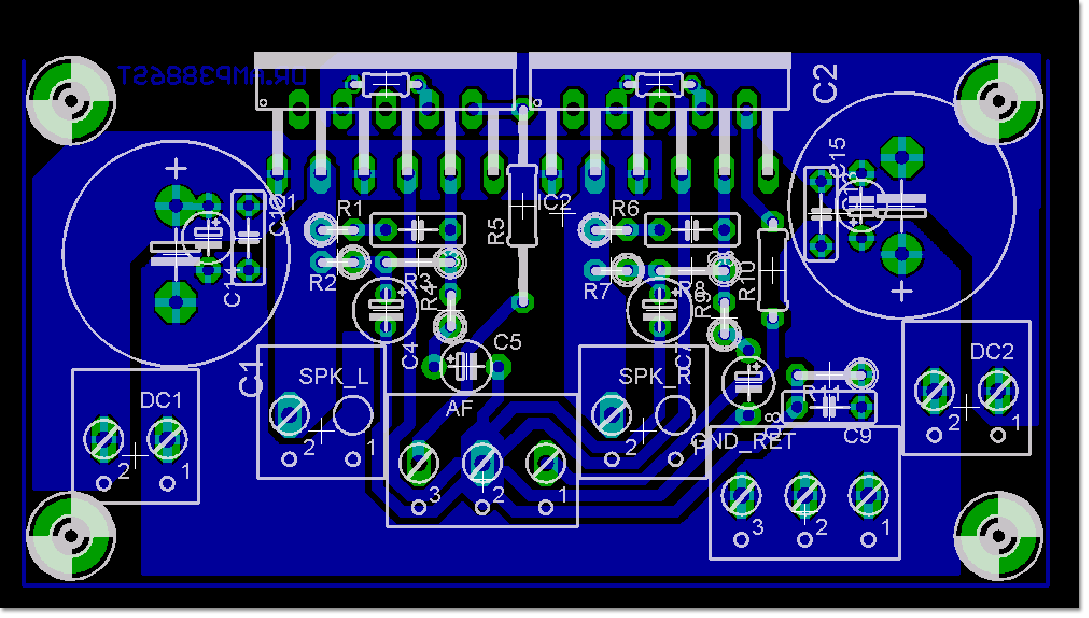
The circuit implementation, I developed a very simple thanks will print circuits.
As can be seen in front view, compact and small structure, although a bit cramped due to a design is a design away from the noise. Especially NFB (negative feedback) reinforces this function to keep the line short. The circuit is quite good results have been applied by me in this state.
Installation is very smooth, but not in this state, creates wonders. As you can see all the entries and exits occur in printed circuit-type terminals. In addition, another point to consider the entire circuit should use 1% tolerance metal film resistors. Otherwise you can get results close to mine, but never the same result!
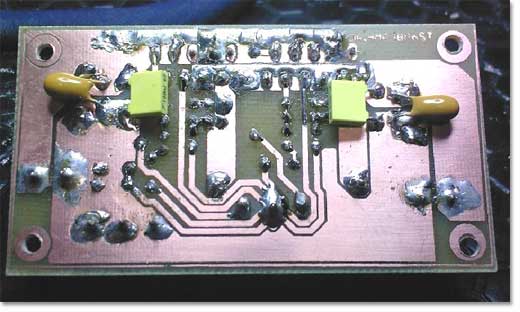
Ventral view of the circuit elements such as print ... we have seen have to be mounted on the rear surface witnessed. However, power lines must be kept short and to the rear assembly will allow it. Integrated into the supply lines for installation under other parts of a subject prior to installation by applying a little solder solder paste should nutrition. As can be seen clearly in my application that my job is very simple although time consuming, except that there is a difficulty.
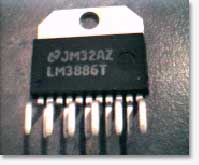
In the meantime, you must remind you that the integrated circuit LM3886 is available in two versions: one with insulated jacket LM3886TA
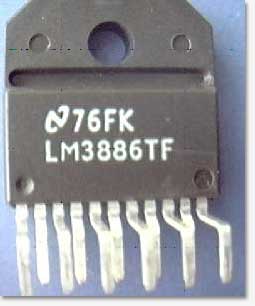
And the other one is insulated jacket LM3886TF is.
I sit on my application for isolators insulated cooler pouch and used a direct connection with silicone grease More manageable. However, the TA will use cover your friends always cooler entegrelerini insulator and silicon gresiyle bindings also called the screw holes in the bead with the support of the bolt should be insulators.
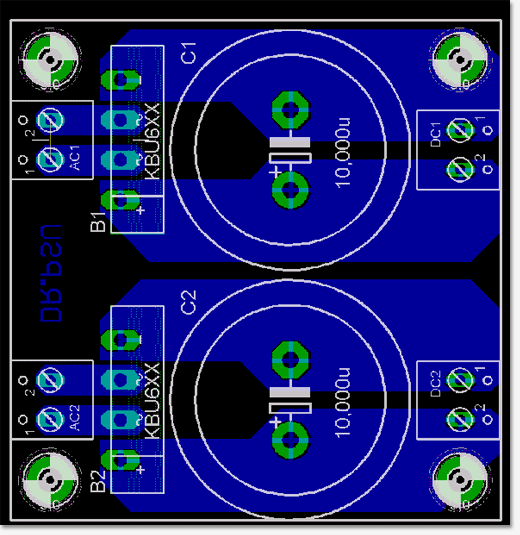
The power supply printed circuit board are as follows.
I think this issue would be unnecessary to do too much explanation. Simply PCB terminal four, two KBU6 series diode bridge and two hood 10.000 inductance capacitor 35V ... This card is designed to be completed in a simple, amplifkatörümüzle will take place in the same box and will link with amplifkatör (DC1 and DC2) cables will be kept very short.
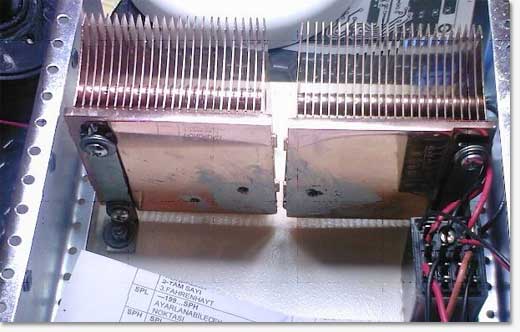
Cooler subject, will be mounted about the last detail. Housing accounts for the TA according to the users of 8ohm 2.8 ° C / W will use the value of a cooler. Approximately 5cm x 10cm in size, which has 8 or more canada is a simple aluminum cooler. For the TF case, this value is 1.8 ° C / W, and this is exactly twice the size and number of wing comes with a cooler anlmına needs. I may try something smaller, such as those using copper heat sink. Also like me more than the average in size for a listener. I am in my application two socket A (AMD Athlon) to connect a copper heatsink with no fan I used to each other.
50-10 YTL per standard cooler, which is expensive, but we think the total is around 35YTL solution ... This is a stylish and small vented box application listening on the average two-hour (approximately 20W x 2 rock music) used successfully passed the test firing. This test is done simply as follows: two hours of listening to often run amplinizi conditions and at the end of your finger on the front sides of ICs and paste, if you can keep soğutucunuz business is a means of more than 10 seconds. Also in this case, cooler surface temperatures must be very close to it. Of course, if the thermocouple thermometer if you have a tip on the surface of an integrated measurement criteria will be 65 ° C, the temperatures on the thermal protection is often triggered after a while and will cause you to lose valuable entegrenizi. Integrated very hot, but cooler in warm, even cold, there is an occasional contact with the problem. In this case, I suggest that you check your links and silicon gresinizi.
NOTE: The picture in the right tarfta relay power relay. A very tiny switch on the front panel and four-channel kulandığım (DC1 + - and DC2 + -) at the same time to cut the relay I added this to turn out. I recommend it.
ASSEMBLY:
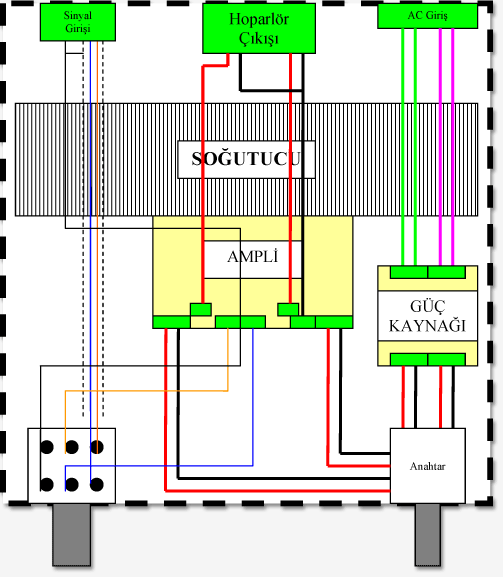
In total, the device on making cards, collect them in one or a few boxes to be mounted firmly. Timber as possible aesthetic for this work, two pieces of plastic or metal box, we will need. For every two cans surely must have ventilation holes. Otherwise, the system for a long time executable. Case selection in the installation of the box to leave you behind.
You know it looks a little complex but can not be explained simply wish to accept. First, the back panel is three terminals / port will connect. The first of these is a 4-pin power connector. The hard drive for PCs used in the 4-pin female connection and the men used to increase the use of them. PROBLEMS YOU how you will mount the box:)
Use the standard speaker terminals for the speaker outputs;
For the terminal like this can use a standard RCA signal inputs;
I'll make an amplifier for single-input single-group, I used it. Entry may increase the number of friends who wish to wish. However, the minimum noise level is recommended for single entry, as I do.
The most critical point during installation connects to the signal lines. If you do not exactly on the end result will tell the actual noise will be your masterpiece;
WARNINGS:
Signal input of the box you plug the RCA end of the shortest path to the chassis connector and cable to the amplifier directly to the card, preferably a thin end of the AF-coded terminal connect the middle.
A ynı RCA connector (signal input) signal to the left and right ends of a shielded cable (LIYCY) sound level potentiometer (when you look at the bottom) Connect the ends of the far right. RCA connector cable to the chassis, connect the screen only as a one-sided. Never move the display line chassis!
You get the middle two ends of the potentiometer in a very short line (short is very important) are still shielded cable to connect the AF-coded terminal block, right-and left alone, as two-sided one side of the cable ekranlamasını this time frame, ie the middle end of the AF klemesinin another look at the bottom left of the beginning of the two potentiometers Connect to the terminal by combining the two. ABSOLUTELY DO NOT CONNECTED TO THE SAME LINES ON TWO SEPARATE FRAME.
Potentiometer at the entrance connector RCA CHASSIS LINK DO.
ABSOLUTELY NOT RUN potentiometer AMPLİYİ. Potentiometer integrated input at the same time as the load tries to run without it makes the integrated severe oscillation and tweeter'larınızı you will burn!
Model sheathed insulated cooler LM3886TA'yı Use connecting the insulator , as well as bolts nug (beads) Insulators called Connect . Amplinize power before you measure the resistance between two metal parts are integrated . Should be open circuit if the circuit is closed, ie, conductivity, you - you are rail connected to each other and the result is not pleasant at all.
If you move to another kind of signal cycle consists of the chassis and amplifkatörünüz 100Hz wheezing Si starts .
Speaker connections (+) ends of the CMB will be coded terminals. This is the only bacaklıdır terminals. Other tips will be the GND-RET-coded terminals. This is chassis power distribution point. To this point, the signal should not be made any connection to the chassis. Also prompted a tip box at this point the body can be achieved by taking şasileme better. This process is sometimes done by trying this kind of problem can also generate a şasileme.
A final note for installation: the power connections and speaker connections for at least 1.5mm 2 cross-section multi-core cables should be used. Otherwise, due to warming there is a risk of fire .
SPEAKER:
We came to the end of the job. First of all I would like to appear despite the formation of this design as a result of very high quality components and calculated the basic criterion to determine the choice of the speaker. I suggest that you request your money can afford the best quality bass and tweeter.
Bass 4 or 8 ohms, depending on preference for at least 16 20cm in diameter and most certainly not the subwoofer bass speaker should be taken. Should at least come up to 3kHz frequency curve that is a good duo together oluştursun tweeterle. Has a frequency response from 500-1Khz subwoofers in general, and Naughty are doing.
Bass still has the same impedance for Tweeter (4 or 8 ohms) should be preferred at least 50W health dome tweeter. Piezo tweeter definitely would not recommend.
Passive filters use only the serial polarizasyonsuz capacitor. Take two pieces of each value 1μF to 10μF with them and listening to your taste into one of the tweeter in series. It's that simple.
Case work (ilgilendirmediğinden me) is the most easy part. 18mm chipboard or MDF for the bass around 16cm from 10lt. preferably 15lt, 20lt, preferably at least 15 to 20cm. boxes and make off. 10lt box is a good example;
20cm width of the front face,
25 cm depth and
Height of 30 cm will be.
"But more than these dimensions will 10lt" for the speakers should also remind the addition of a volume.
Diameter holes on the front of the cabinet for the bass and tweeter Open a. Rear side connection terminal to use the holes for him to use a single cable. the critical point , inside the cabin completely fill it with fiber. Do not too tight but too loose. Then mount the speakers. To be aware of this issue at the ports of the box should prevent air leakage does. To do this you need to all corners of the inner rims silikonlayın.
A final note: the amplifier gain is still 26 dB, ie 20vv. This, for some low-level outputs (ipod, etc.) may be insufficient. My friends can not get enough volume at the end of the application according to the result yazarlarsa me add a simple preamp project.
Easy come ..
Dr.
Material List
Semiconductors:
LM3886TA (TF) 2 Units
KBU608 2 Units
Capacitors:
10.000 inductance 35 (50) v 2 Units
Inductance 1.000 35 (50) v 2 Units
10μF 35 (50) v Tantalum 4 Units
Inductance 2.2 35 (50) v Tantalum 2 Units
63v 470nF Polyester 1 Piece
Ceramic 100nF 63v 2 Units
63v 150nF Polyester 2 Units
Resistors:
20K 0.6 W 1% Metal Film Resistor 2 Units
20K 1/8W 5% Carbon Resistor 2 Units
15K 0.6 W 1% Metal Film Resistor 2 Units
10K 0.6 W 1% Metal Film Resistor 2 Units
0.6 W 1% Metal Film Resistor 1K 4 Units
2.2 ohm 1/4W 5% Carbon Resistor 1 Piece
Other:
10K x 2 Tandem Logarithmic Potentiometer
2 x 18 (24) V Toroid or EI type transformer (250 or 350W)
middle end of the leave
2.8 ° C / W heatsink not less than
RCA-type terminal
Speaker terminal
4-pin power terminal (male / female)
Cable and other material.
|
|
|
| |
Accurate LC Meter
Build your own Accurate LC Meter (Capacitance Inductance Meter) and start making your own coils and inductors. This LC Meter allows to measure incredibly small inductances making it perfect tool for making all types of RF coils and inductors. LC Meter can measure inductances starting from 10nH - 1000nH, 1uH - 1000uH, 1mH - 100mH and capacitances from 0.1pF up to 900nF. The circuit includes an auto ranging as well as reset switch and produces very accurate and stable readings. |
|
PIC Volt Ampere Meter
Volt Ampere Meter measures voltage of 0-70V or 0-500V with 100mV resolution and current consumption 0-10A or more with 10mA resolution. The meter is a perfect addition to any power supply, battery chargers and other electronic projects where voltage and current must be monitored. The meter uses PIC16F876A microcontroller with 16x2 backlighted LCD. |
|
|
|
60MHz Frequency Meter / Counter
Frequency Meter / Counter measures frequency from 10Hz to 60MHz with 10Hz resolution. It is a very useful bench test equipment for testing and finding out the frequency of various devices with unknown frequency such as oscillators, radio receivers, transmitters, function generators, crystals, etc. |
|
1Hz - 2MHz XR2206 Function Generator
1Hz - 2MHz XR2206 Function Generator produces high quality sine, square and triangle waveforms of high-stability and accuracy. The output waveforms can be both amplitude and frequency modulated. Output of 1Hz - 2MHz XR2206 Function Generator can be connected directly to 60MHz Counter for setting precise frequency output. |
|
|
|
BA1404 HI-FI Stereo FM Transmitter
Be "On Air" with your own radio station! BA1404 HI-FI Stereo FM Transmitter broadcasts high quality stereo signal in 88MHz - 108MHz FM band. It can be connected to any type of stereo audio source such as iPod, Computer, Laptop, CD Player, Walkman, Television, Satellite Receiver, Tape Deck or other stereo system to transmit stereo sound with excellent clarity throughout your home, office, yard or camp ground. |
|
USB IO Board
USB IO Board is a tiny spectacular little development board / parallel port replacement featuring PIC18F2455/PIC18F2550 microcontroller. USB IO Board is compatible with Windows / Mac OSX / Linux computers. When attached to Windows IO board will show up as RS232 COM port. You can control 16 individual microcontroller I/O pins by sending simple serial commands. USB IO Board is self-powered by USB port and can provide up to 500mA for electronic projects. USB IO Board is breadboard compatible. |
|
|
|
|
ESR Meter / Capacitance / Inductance / Transistor Tester Kit
ESR Meter kit is an amazing multimeter that measures ESR values, capacitance (100pF - 20,000uF), inductance, resistance (0.1 Ohm - 20 MOhm), tests many different types of transistors such as NPN, PNP, FETs, MOSFETs, Thyristors, SCRs, Triacs and many types of diodes. It also analyzes transistor's characteristics such as voltage and gain. It is an irreplaceable tool for troubleshooting and repairing electronic equipment by determining performance and health of electrolytic capacitors. Unlike other ESR Meters that only measure ESR value this one measures capacitor's ESR value as well as its capacitance all at the same time. |
|
Audiophile Headphone Amplifier Kit
Audiophile headphone amplifier kit includes high quality audio grade components such as Burr Brown OPA2134 opamp, ALPS volume control potentiometer, Ti TLE2426 rail splitter, Ultra-Low ESR 220uF/25V Panasonic FM filtering capacitors, High quality WIMA input and decoupling capacitors and Vishay Dale resistors. 8-DIP machined IC socket allows to swap OPA2134 with many other dual opamp chips such as OPA2132, OPA2227, OPA2228, dual OPA132, OPA627, etc. Headphone amplifier is small enough to fit in Altoids tin box, and thanks to low power consumption may be supplied from a single 9V battery. |
|
|
|
|
|
Arduino Prototype Kit
Arduino Prototype is a spectacular development board fully compatible with Arduino Pro. It's breadboard compatible so it can be plugged into a breadboard for quick prototyping, and it has VCC & GND power pins available on both sides of PCB. It's small, power efficient, yet customizable through onboard 2 x 7 perfboard that can be used for connecting various sensors and connectors. Arduino Prototype uses all standard through-hole components for easy construction, two of which are hidden underneath IC socket. Board features 28-PIN DIP IC socket, user replaceable ATmega328 microcontroller flashed with Arduino bootloader, 16MHz crystal resonator and a reset switch. It has 14 digital input/output pins (0-13) of which 6 can be used as PWM outputs and 6 analog inputs (A0-A5). Arduino sketches are uploaded through any USB-Serial adapter connected to 6-PIN ICSP female header. Board is supplied by 2-5V voltage and may be powered by a battery such as Lithium Ion cell, two AA cells, external power supply or USB power adapter. |
|
200m 4-Channel 433MHz Wireless RF Remote Control
Having the ability to control various appliances inside or outside of your house wirelessly is a huge convenience, and can make your life much easier and fun. RF remote control provides long range of up to 200m / 650ft and can find many uses for controlling different devices, and it works even through the walls. You can control lights, fans, AC system, computer, printer, amplifier, robots, garage door, security systems, motor-driven curtains, motorized window blinds, door locks, sprinklers, motorized projection screens and anything else you can think of. |
|
|
|