| |
There is one amplifier configuration that is universally accepted as the ideal for audio use: Class A operation. Many early amplifiers operated in Class A, but as output powers rose above 10W the problems of heat dissipation and power supply design caused most manufacturers to turn to the simpler, more efficient Class B arrangements and to put up with the resulting drop in perceived output quality.
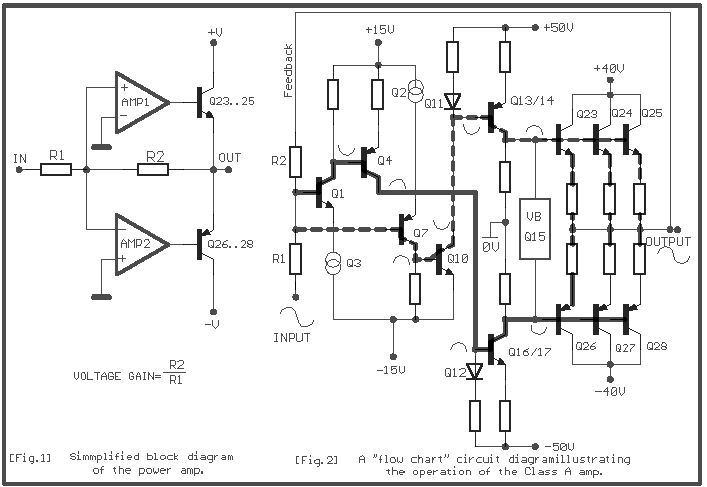
Why Class A? Because, when biased to class A, the transistors are always turned on, always ready to respond instantaneously to an input signal. Class B and Class AB output stages require a microsecond or more to turn on. The Class A operation permits cleaner operation under the high-current slewing conditions that occur when transient audio signal are fed difficult loads. His amplifier is basically simple, as can be seen from the block diagram.
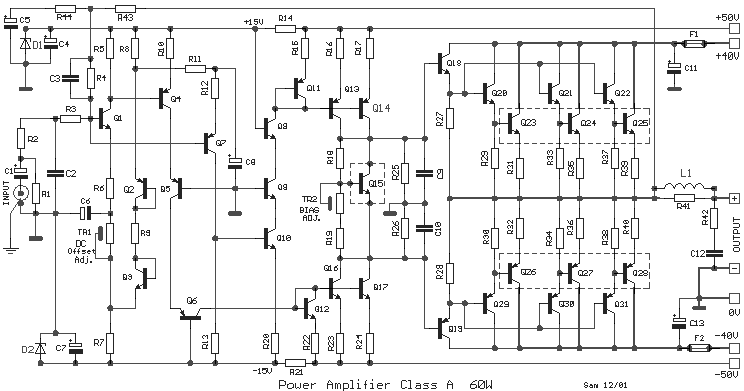
The simplified circuit [Fig.2] shows that each sub-amplifier consists of two voltage gain stages. The first stage consists of a complementary two�stage common emitter [Q1-7] whose gain is about x2.3. The second stage is a current mirror stage [Q13-14] which drives the voltage across a load resistor tied to 0V. the gain of this stage is about x200. Thus the overall open loop voltage gain is of the order of x460 and so, as the closed loop gain is x26.7, the reduction due to negative feedback is x17.2 or about 24db. The input amplifiers are powered from ± 15V supply rails derived from R14-D1 and R21-D2. The current through the first stage [Q1] is held constant, at about 0.36mA by the floating regulator stage [Q2-3] which provides temperature compensation . The gain of this stage is set by emitter resistor R6 which provides some local negative feedback. The second stage [Q4] is loaded by two series cascode transistor [Q5-6], the first having its base tied to ground and the second having its base tied to the �15V rail. Thus the maximum collector- voltage swing on Q4 is greatly reduced , so reducing the effect of the base-collector capacitance [Miller effect] which would reduce this stages high frequency bandwidth. In summary , the presence of Q5 and Q6 improves the bandwidth and linearity. The load on Q6 is one half [Q12] of the current mirror and can be visualized as a resistor in series with a forward �biased diode. The second half of the current mirror is a common-emitter stage [Q16-17], a simple voltage amplifier except that its collector current equals [or ��mirrors��] the collector current of the other half [Q12].This stage is made up of two transistor in parallel which share the current. This arrangement was found to improve the linearity of the stage. The other sub-amplifier [Q7 to Q14] works in exactly the same way but with opposite polarity. The output stage uses the conventional Darlington emitter follower arrangement, but with three parallel pairs of driver and output transistors. A transistor Q15 is wired across the bases of the pre-driver transistors [Q18-19], providing a bias voltage to set the standing current in the output stage. Q15 is mounted on the heatsink with the aim of keeping this current constant regardless of temperature. The TR2 trimmer is used to set the value of this current.
The output DC offset voltage is set to zero by TR1 trimmer, in the input stage. In theory there should be no DC offset at the output but, because of component tolerances and consequent mismatching , there always is. TR1 is arranged to make the current in the first stage of one ��sub-amplifier�� either higher or lower than in other and so null out any residual offset. A simple low-pass filter is created by an RC networks at the input R2,C2 to reduce the bandwidth of the signal below that of the open loop amplifier and thereby eliminate the generation of any transient intermodulation distortion.
The output stage is quite substantial, using a total of six 250W power transistors. Fairly 'old- fashioned' power transistors have been used [MJ4502/802 family] in preference to some of the higher performance devices now available. They have been chosen because the die used to mount the semiconductor junction is of a large area ; the device is quite rugged and can handle high currents. The short term current capability of the output stage is, in fact, of the order of 90A, somewhat in excess of the current capability of the wiring. The rest of construction is equally massive with a steel chassis supporting six very large heatsinks. However , construction is straightforward provided that the builder has strong arm muscles and circuit alignment simple- there are but two adjustments- quiescent current and DC offset voltage nulling.The coil L1 is wound onto the body of R41. This is not a critical procedure- about 17 to 20 turnoff enameled copper wire should do nicely. Particular care should be taken in mounting the power transistors. Good quality insulating washers and bushes should be used and a generous smearing of thermal paste is essential. These transistors should be bolted to the heatsinks very tightly to ensure good thermal contact at all temperatures. One final point regarding construction. Once the amplifier has been completed and tested, it should be switched on and allowed to reach its normal operating temperature [about 20 minutes]. The amplifier should then be switched off and all the screws tightened up. Differences in thermal coefficients of expansion can result in some of the screws becoming slightly loose, particularly those holding the heatsinks to the top and bottom covers.
My own proposal, for whoever it decides makes the amplifier, is him it manufactures in two separate boxes, one for each channel, [monoblock manufacture ], separating thus and the power supply's. This will facilitate too much the mechanic and electrical manufacture. For all the manufacture, is required certain relative experience, in these sectors. The sound result is sure that it will vindicate, that tries, one and proportional performance amplifiers in the trade, costs exceptionally expensively.
Part List
R1=47Kohm R31-32-35-36-39-40=0.22ohm 5W D1-2=15V 1.3W zener
R2-9-27-28=1Kohm R41=10ohm 3W Q1-3-8-9-10-15-18=MPSA06
R3-18=10Kohm R42=10ohm 1W Q2-4-5-6-7-19=MPSA56
R4=18Kohm R43=5.6Kohm Q11-13-14=MPSA93
R5-13=3.9Kohm R44=330Kohm Q12-16-17=2N6515
R6-12=560ohm TR1=22Kohm trimmer Q20-21-22=BD379
R7-8-19=2.7Kohm TR2=2.2Kohm trimmer Q23-24-25=MJ802
R10-20=120ohm C1=10uF 16V Q26-27-28=MJ4502
R11=12Kohm C2=1.5nF 100V MKT Q29-30-31=BD380
R14-21=680ohm 0.5W C3-9-10=100pF ceramic or Mylar L1= see text
R15-22-29-30-33-34-37-38=100ohm C4-5-6-7-8=100uF 25V F1-2=5A fuse fast
R16-17-23-24=220ohm C11-13=220uF 63V .
R25-26=22Kohm C12=220nF 250V MKT
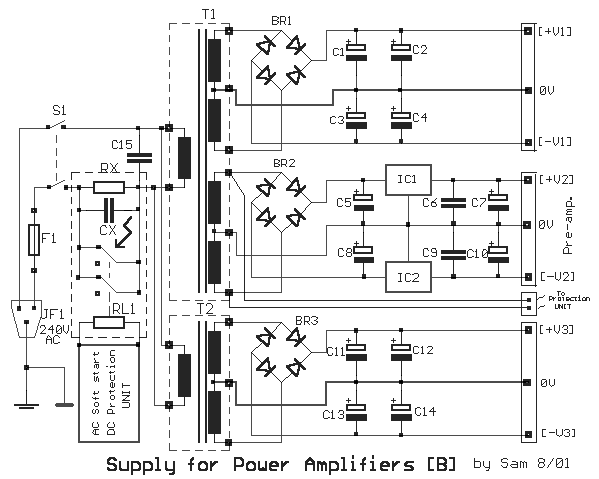
Here is the circuit of power supply, for Power amplifier 60W Class A. He is one relatively simple and classic power supply. In the line of input, exist, the classic circuit of protection and soft start. In the circuit appear two transformers. This can change and all the coils they become on one transformer. What it should we are careful, they are the cables that transport power voltage ± V1 [ ± 40V ], are also big cross-section with investment of silicone, so that, they bear in the currents that they will go through from in their, but also the temperatures in which they will be found. The connections in the various points should become with screws. For other two coils of transformer, does not need something particular. If you did not need the coil of ± 15V, we can suppress, also the supply of circuit of protection, it become from the other coil of transformer. Attention should be given in the region, round relay RL1, in primary of the transformer, which should also header well. The bridge of rectifier BR1, should bolt in some point of chassis, so that is frozen. Obvious is that will be supposed exist a transformer, for each power amplifier.
Part List For Power Supply
C1....4=15000uF 63V C15=33nF 630V S1= 2X2 switch 250V/10A
C5-8=2200uF 25V BR1=Bridge 250V 35A IC1=7812 IC2=7912
C6-9=100nF 100V BR2=Bridge 250V 3A T1=230VAC// 2X28V AC - 500VA
//2X15V AC - 20VA
T2=230VAC // 2X35V AC - 40VA
C7-10=47uF 25V BR3=Bridge 250V 3A
C11....14=1000uF 63V F1=Fuse 3.15A slow block
Related Links
Downloads
60W Class-A Power Amp - Link
|
|
|
| |
Accurate LC Meter
Build your own Accurate LC Meter (Capacitance Inductance Meter) and start making your own coils and inductors. This LC Meter allows to measure incredibly small inductances making it perfect tool for making all types of RF coils and inductors. LC Meter can measure inductances starting from 10nH - 1000nH, 1uH - 1000uH, 1mH - 100mH and capacitances from 0.1pF up to 900nF. The circuit includes an auto ranging as well as reset switch and produces very accurate and stable readings. |
|
PIC Volt Ampere Meter
Volt Ampere Meter measures voltage of 0-70V or 0-500V with 100mV resolution and current consumption 0-10A or more with 10mA resolution. The meter is a perfect addition to any power supply, battery chargers and other electronic projects where voltage and current must be monitored. The meter uses PIC16F876A microcontroller with 16x2 backlighted LCD. |
|
|
|
60MHz Frequency Meter / Counter
Frequency Meter / Counter measures frequency from 10Hz to 60MHz with 10Hz resolution. It is a very useful bench test equipment for testing and finding out the frequency of various devices with unknown frequency such as oscillators, radio receivers, transmitters, function generators, crystals, etc. |
|
1Hz - 2MHz XR2206 Function Generator
1Hz - 2MHz XR2206 Function Generator produces high quality sine, square and triangle waveforms of high-stability and accuracy. The output waveforms can be both amplitude and frequency modulated. Output of 1Hz - 2MHz XR2206 Function Generator can be connected directly to 60MHz Counter for setting precise frequency output. |
|
|
|
BA1404 HI-FI Stereo FM Transmitter
Be "On Air" with your own radio station! BA1404 HI-FI Stereo FM Transmitter broadcasts high quality stereo signal in 88MHz - 108MHz FM band. It can be connected to any type of stereo audio source such as iPod, Computer, Laptop, CD Player, Walkman, Television, Satellite Receiver, Tape Deck or other stereo system to transmit stereo sound with excellent clarity throughout your home, office, yard or camp ground. |
|
USB IO Board
USB IO Board is a tiny spectacular little development board / parallel port replacement featuring PIC18F2455/PIC18F2550 microcontroller. USB IO Board is compatible with Windows / Mac OSX / Linux computers. When attached to Windows IO board will show up as RS232 COM port. You can control 16 individual microcontroller I/O pins by sending simple serial commands. USB IO Board is self-powered by USB port and can provide up to 500mA for electronic projects. USB IO Board is breadboard compatible. |
|
|
|
|
ESR Meter / Capacitance / Inductance / Transistor Tester Kit
ESR Meter kit is an amazing multimeter that measures ESR values, capacitance (100pF - 20,000uF), inductance, resistance (0.1 Ohm - 20 MOhm), tests many different types of transistors such as NPN, PNP, FETs, MOSFETs, Thyristors, SCRs, Triacs and many types of diodes. It also analyzes transistor's characteristics such as voltage and gain. It is an irreplaceable tool for troubleshooting and repairing electronic equipment by determining performance and health of electrolytic capacitors. Unlike other ESR Meters that only measure ESR value this one measures capacitor's ESR value as well as its capacitance all at the same time. |
|
Audiophile Headphone Amplifier Kit
Audiophile headphone amplifier kit includes high quality audio grade components such as Burr Brown OPA2134 opamp, ALPS volume control potentiometer, Ti TLE2426 rail splitter, Ultra-Low ESR 220uF/25V Panasonic FM filtering capacitors, High quality WIMA input and decoupling capacitors and Vishay Dale resistors. 8-DIP machined IC socket allows to swap OPA2134 with many other dual opamp chips such as OPA2132, OPA2227, OPA2228, dual OPA132, OPA627, etc. Headphone amplifier is small enough to fit in Altoids tin box, and thanks to low power consumption may be supplied from a single 9V battery. |
|
|
|
|
|
Arduino Prototype Kit
Arduino Prototype is a spectacular development board fully compatible with Arduino Pro. It's breadboard compatible so it can be plugged into a breadboard for quick prototyping, and it has VCC & GND power pins available on both sides of PCB. It's small, power efficient, yet customizable through onboard 2 x 7 perfboard that can be used for connecting various sensors and connectors. Arduino Prototype uses all standard through-hole components for easy construction, two of which are hidden underneath IC socket. Board features 28-PIN DIP IC socket, user replaceable ATmega328 microcontroller flashed with Arduino bootloader, 16MHz crystal resonator and a reset switch. It has 14 digital input/output pins (0-13) of which 6 can be used as PWM outputs and 6 analog inputs (A0-A5). Arduino sketches are uploaded through any USB-Serial adapter connected to 6-PIN ICSP female header. Board is supplied by 2-5V voltage and may be powered by a battery such as Lithium Ion cell, two AA cells, external power supply or USB power adapter. |
|
200m 4-Channel 433MHz Wireless RF Remote Control
Having the ability to control various appliances inside or outside of your house wirelessly is a huge convenience, and can make your life much easier and fun. RF remote control provides long range of up to 200m / 650ft and can find many uses for controlling different devices, and it works even through the walls. You can control lights, fans, AC system, computer, printer, amplifier, robots, garage door, security systems, motor-driven curtains, motorized window blinds, door locks, sprinklers, motorized projection screens and anything else you can think of. |
|
|
|