| |
Direct SW Receiver for AM, AM-SSB & CW Signals |
|
Home » Radio » Direct SW Receiver for AM, AM-SSB & CW Signals
Direct SW Receiver for AM, AM-SSB & CW Signals
Advertisement
SSB stands for Single Side Band, which signifies the amplitude - modulated signal which gets its signal carrier and one sideband suppressed in the transmitter. Carrier suppressing gives huge savings in transmission power (the power necessary to accomplish the desired reach of the signal is significantly smaller than in the conventional - type transmitters), and cancellation of one sideband makes the signal have its spectrum two times narrower, allowing twice as many transmitters as usual to be placed into the same bandwidth.
CW is for Continuous Wave, which determines the radio link where the Morse Code is being transmitted by cutting the oscillator work in the transmitter.
SSB and CW signals are impossible to accomplish with the receivers that use the ordinary diode - type detector (earlier described AM receivers). The receipt can be done only by bringing another signal into the detector, the HF signal from the oscillator, known as the BFO (Beat Frequency Oscillator). Simpler solutions, however, do exist. These are the reaction - type receivers, i.e. receivers with positive feedback.
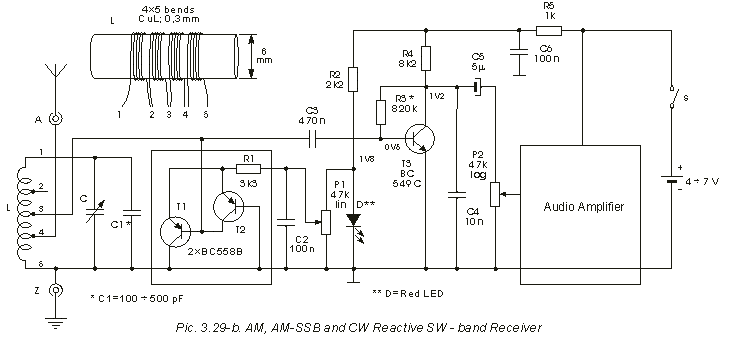
You have been able to see one of them in the previous project (3.29-a), and here we’ll take a look at another one, which works so nice that we were sometimes having the impression it beats up much more sophisticated, modern supereterodyne receivers. Its electrical diagram is shown on Pic.3.29-b.
The coil L and capacitors C and C1 form a parallel oscillatory circuit whose role is to separate and amplify the signal of the tuned station, and to suppress all others. It doesn’t entirely succeed in that, however. The reason for this is small Q- factor of the oscillatory circuit, being such because of big energy losses in the circuitry. There are many kinds (reasons) of these losses, but we can imagine in first approximation that there’s a resistor RG in the circuit which represents these losses, its resistance being such that the oscillating current transforms itself into heat dissipation energy on it, its amount being the sum of all the (actual) losses in the circuit. We could, furthermore, solve the problem of these losses if connecting serially to RG a resistor RG’, whose resistance would be negative and equal to the value of RG by its absolute value. The overall resistance would then be zero, there would be no energy losses and the Q- factor would become infinite. The oscillatory circuit would, together with the components that create this negative resistance, become an oscillator capable of receiving SSB and CW signals.
We don’t really need an infinite Q- factor while receiving usual (conventional) AM RG by its absolute value. The resistances would not cancel each other completely, but the losses would be made very small, the Q- factor therefore becoming very big therefor increasing both the selectivity and sensitivity of the oscillatory circuit.
Transistors T1 and T2 constitute, together with resistor R3, a two-stage amplifier with strong positive feedback that has a negative dynamic input resistance. This negative resistance is connected between the leg No.3 on the coil and the ground, therefore superimposing itself with the resistance representing losses of the circuit. The quantity of this negative resistance depends on the amount of the DC current flowing through the transistors, which is being regulated by altering the DC voltage on the right end of the R3 resistor (by moving the slider of the P1 potentiometer).
The red LED D and the resistor R2 comprise a simple voltage stabilizer, obtaining 1.8 V of stabilized voltage on the P1. That means that the voltage on the right end of R3 shifts between 0 and 1.8 V while moving the slider of P1. The current flowing through the transistors thereat also changes, causing the voltage on the left end of R3 to vary between 0 and 0.6 V.
The signal of the station is being led from the leg No.3 of the coil into the collector-type detector made of T3, R3, R4 and C4. That is an AM signal detector that performs both signal detection and its amplification. Its name is the Audion. The LF signal is then, from the collector of T3, over the coupling capacitor C5, being led onto the sound volume potentiometer P2 and the audio amplifier. For the latter any of the earlier described devices can be used.
Tuning this receiver on the desired station requires both some knowledge and patience (that’s what finally “buried” this kind of receivers). Put the slider P1 in the upmost position. If strong whistling is heard that means the oscillating began. Move the slider carefully downwards until the oscillating stops. Then start slowly turning the rotor of the capacitor C until you come upon some station. If the whistling re-appears, move the slider of the potentiometer very little downwards, the whistling should stop and you should be able to hear the radio - station programme from the loudspeaker (loud and clear). For the next station tune yourself with C, then move the slider P1 upwards until the whistling appears, then put the slider back until it stops etc. All this may seem rather complex at first, but with a little practice and with two hands all will go quick and smooth.
The abovementioned method is for the signal reception of ordinary, broadcast stations. If you wish to receive the SSB and CW signals you should move the P1 slider upwards until the oscillating is achieved, so that articulate speech (SSB) or Morse code signs (CW) can be heard from the loudspeaker.
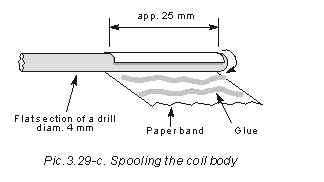
* The coil L is being made on the cylindrically - shaped body 6 mm in diameter, about 25 mm long. The plastic - made body taken from an old device is the best, like the one shown on Pic.5.14-b. The screw-shaped core allows the setup of the inductance, adjusting therewith the reception bandwidth of the device. If you cannot find such coil body, any plastic- or carton- made cylinder can be used instead. If you don’t have even that, then make yourself one. Cut the paper band to be 25 mm wide and about 150 mm long and reel it around the flat part of the 4 mm drill, adding every now and then some glue (UHU or similar). When the glue gets dry, remove the coil body off the drill.
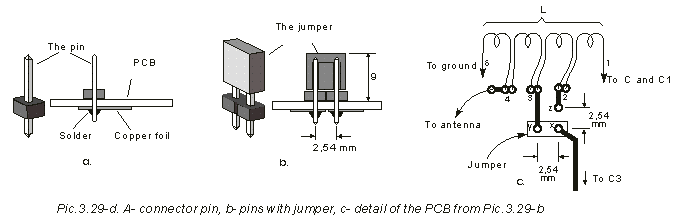
The coil L has the total of 20 quirks of the lacquer - isolated copper wire, having 0.3 to 0.5 mm in diameter. A leg should be made on every fifth quirk. Latching of the wire ends (with small holes made in the coil body), as well as leg making (by making wire loops) can be done acc. to the instructions given with Pic.3.6. It can also be accomplished differently, as shown on Pic.3.29-b. First, 4 separate coils, each one made of 5 wire rings, are made side-by-side on the coil body. The starts and ends are fixed with scotch tape. The isolation is then removed from all coil ends, about 5 mm in length, after which they are tinned. On the PCB the legs are being soldered in pairs, the end of one coil with the beginning of the next (they are put together in the same hole on the PCB). For example, the end of the second and the beginning of the third coil should be connected on the same line where contact for the left end of C3 capacitor is, thus creating the leg No.3 of the coil. Putting two wires through one hole is not a very professional solution. The “real thing” are separate junctions, one for each wire, as shown on Pic.3.29-d-c.
* The feedback may happen to be not big enough, causing that there’s no oscillating even when the P1 slider is in the rightmost position. In that case, leg No.2 of the coil should be used instead of No.3. Switching between the legs can be done in many ways, the nicest (?) one given on Pic.3.29-d, made with factory-made contact pins and jumpers. On Pic.3.29-d-c you can see a detail of the PCB for the receiver shown on Pic.3.29-b. In the contacts marked as x, y and z (distance between them is 1/10 inch) the contact pins are soldered. The jumper is in position marked with dashed line, therefore making contacts x and y short-circuited. When it is moved in vertical position, the x and z contacts are in junction. In former case the coil leg No.3 is used, and in the latter it is No.2. In factory-made devices, these jumpers and contacts are used, together with appropriate connectors, to connect the PCB to the loudspeaker, power supply, variable capacitors, various switches etc.
* Setting the collector-type detector circuit to optimum operation is done by changing the R3 resistance, until voltage on the collector of BC549C is 1.2 V.
* The antenna can be a piece of copper wire no longer than 50 cm, but with longer (few metres), external antenna, the results will be much better.
* This receiver is scheduled for the reception of SW stations from 6 MHz till 9 MHz, which is accomplished with C1 value of about 400 pF. The exact value for C1 is being determined experimentally and can be significantly different. Going down to the amateur range (about 3.75 MHz) is performed with bigger C1 capacitance.
Related Links
Downloads
Direct SW Receiver for AM, AM-SSB & CW Signals - Link
|
|
|
| |
Accurate LC Meter
Build your own Accurate LC Meter (Capacitance Inductance Meter) and start making your own coils and inductors. This LC Meter allows to measure incredibly small inductances making it perfect tool for making all types of RF coils and inductors. LC Meter can measure inductances starting from 10nH - 1000nH, 1uH - 1000uH, 1mH - 100mH and capacitances from 0.1pF up to 900nF. The circuit includes an auto ranging as well as reset switch and produces very accurate and stable readings. |
|
PIC Volt Ampere Meter
Volt Ampere Meter measures voltage of 0-70V or 0-500V with 100mV resolution and current consumption 0-10A or more with 10mA resolution. The meter is a perfect addition to any power supply, battery chargers and other electronic projects where voltage and current must be monitored. The meter uses PIC16F876A microcontroller with 16x2 backlighted LCD. |
|
|
|
60MHz Frequency Meter / Counter
Frequency Meter / Counter measures frequency from 10Hz to 60MHz with 10Hz resolution. It is a very useful bench test equipment for testing and finding out the frequency of various devices with unknown frequency such as oscillators, radio receivers, transmitters, function generators, crystals, etc. |
|
1Hz - 2MHz XR2206 Function Generator
1Hz - 2MHz XR2206 Function Generator produces high quality sine, square and triangle waveforms of high-stability and accuracy. The output waveforms can be both amplitude and frequency modulated. Output of 1Hz - 2MHz XR2206 Function Generator can be connected directly to 60MHz Counter for setting precise frequency output. |
|
|
|
BA1404 HI-FI Stereo FM Transmitter
Be "On Air" with your own radio station! BA1404 HI-FI Stereo FM Transmitter broadcasts high quality stereo signal in 88MHz - 108MHz FM band. It can be connected to any type of stereo audio source such as iPod, Computer, Laptop, CD Player, Walkman, Television, Satellite Receiver, Tape Deck or other stereo system to transmit stereo sound with excellent clarity throughout your home, office, yard or camp ground. |
|
USB IO Board
USB IO Board is a tiny spectacular little development board / parallel port replacement featuring PIC18F2455/PIC18F2550 microcontroller. USB IO Board is compatible with Windows / Mac OSX / Linux computers. When attached to Windows IO board will show up as RS232 COM port. You can control 16 individual microcontroller I/O pins by sending simple serial commands. USB IO Board is self-powered by USB port and can provide up to 500mA for electronic projects. USB IO Board is breadboard compatible. |
|
|
|
|
ESR Meter / Capacitance / Inductance / Transistor Tester Kit
ESR Meter kit is an amazing multimeter that measures ESR values, capacitance (100pF - 20,000uF), inductance, resistance (0.1 Ohm - 20 MOhm), tests many different types of transistors such as NPN, PNP, FETs, MOSFETs, Thyristors, SCRs, Triacs and many types of diodes. It also analyzes transistor's characteristics such as voltage and gain. It is an irreplaceable tool for troubleshooting and repairing electronic equipment by determining performance and health of electrolytic capacitors. Unlike other ESR Meters that only measure ESR value this one measures capacitor's ESR value as well as its capacitance all at the same time. |
|
Audiophile Headphone Amplifier Kit
Audiophile headphone amplifier kit includes high quality audio grade components such as Burr Brown OPA2134 opamp, ALPS volume control potentiometer, Ti TLE2426 rail splitter, Ultra-Low ESR 220uF/25V Panasonic FM filtering capacitors, High quality WIMA input and decoupling capacitors and Vishay Dale resistors. 8-DIP machined IC socket allows to swap OPA2134 with many other dual opamp chips such as OPA2132, OPA2227, OPA2228, dual OPA132, OPA627, etc. Headphone amplifier is small enough to fit in Altoids tin box, and thanks to low power consumption may be supplied from a single 9V battery. |
|
|
|
|
|
Arduino Prototype Kit
Arduino Prototype is a spectacular development board fully compatible with Arduino Pro. It's breadboard compatible so it can be plugged into a breadboard for quick prototyping, and it has VCC & GND power pins available on both sides of PCB. It's small, power efficient, yet customizable through onboard 2 x 7 perfboard that can be used for connecting various sensors and connectors. Arduino Prototype uses all standard through-hole components for easy construction, two of which are hidden underneath IC socket. Board features 28-PIN DIP IC socket, user replaceable ATmega328 microcontroller flashed with Arduino bootloader, 16MHz crystal resonator and a reset switch. It has 14 digital input/output pins (0-13) of which 6 can be used as PWM outputs and 6 analog inputs (A0-A5). Arduino sketches are uploaded through any USB-Serial adapter connected to 6-PIN ICSP female header. Board is supplied by 2-5V voltage and may be powered by a battery such as Lithium Ion cell, two AA cells, external power supply or USB power adapter. |
|
200m 4-Channel 433MHz Wireless RF Remote Control
Having the ability to control various appliances inside or outside of your house wirelessly is a huge convenience, and can make your life much easier and fun. RF remote control provides long range of up to 200m / 650ft and can find many uses for controlling different devices, and it works even through the walls. You can control lights, fans, AC system, computer, printer, amplifier, robots, garage door, security systems, motor-driven curtains, motorized window blinds, door locks, sprinklers, motorized projection screens and anything else you can think of. |
|
|
|