| |
12V 2A Linear Power Supply |
|
As you might expect, I have several power supplies that have more than enough capacity to power my new KN-Q7 transceiver. However, my largest power supply is normally connected to my main 100W PEP SSB transceiver. It is capable of 20A and more, but it’s not easy to connect other equipment to it. I also have a smaller 8A power supply, but I use this to power some other VHF and UHF transceivers.
In short, I wanted a simple power supply which I could dedicate to this new transceiver.

Introduction
The KN-Q7 is a low power (QRP) transceiver kit designed in China by amateur radio operator BA6BF.
In order to operate the new transceiver, I needed a power supply. I began by building a power supply with a linear regulator, and later, I modified a laptop power supply. The details are described below.
In addition, I have described how I connected a really cheap computer microphone headset to the KN-Q7.
A tuning aid to help adjusting a manual antenna tuner is also described in detail here on my website. I hope to add some details of my new antenna tuner, complete with it's simple SWR meter, soon.
The KN-Q7 40m QRP SSB transceivers shown here with my new AC power supply I've built and described below.
The Design
The design is simple and well-proven although it varies from the traditional approach to allow the 2N3055 to be directly mounted on the chassis or heatsink without the usual insulating washer
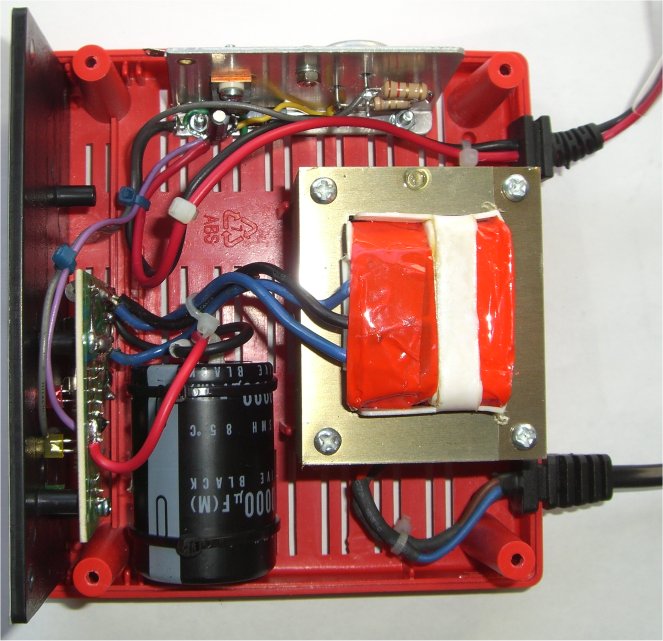
I had a really cheap 12V car battery charger in the workshop which I thought could be easily modified to make a suitable power supply. I quickly discovered that the charger’s transformer was not quite able to supply the transceiver’s peak current load, even though the charger was rated at 2.5A continuous operation! I also found that the cheap charger transformer induced some low level hum into the transceiver when I sat the transceiver on top of the supply.
Fortunately, I had a transformer in my box of bits which I had salvaged a year or two back from an old stereo/CD audio system. These consumer products seem to have a lifetime shorter than a mosquito! The transformer looked big enough, and I measured its secondary voltage at 19VAC (no load). A bit high, but under load, it dropped to about 16VAC. That would be OK. Another nice thing was that I could fit it quite easily into the original charger’s plastic box.
Linear Regulator
The regulator section of the power supply is a slight variation on the standard regulator design shown in the datasheets for the LM7812 12V 1A regulator. To increase the current capability of the regulator, the datasheet shows a circuit using a high power PNP transistor wrapping around the 7812.
If the circuit is inverted, and a -12V regulator (LM7912) is used instead, you gain two advantages. Firstly, I could use a common cheap NPN power transistor such as the 2N3055 shown here. Secondly, the transistor can be bolted directly to a metal chassis without the need for insulating washers and other costly hardware normally required to keep the collector/case of the high power device isolated from the heatsink.
NOTE!! The connections for the LM7912 are NOT the same as those for the LM7812!!
Other Components
I’ve used a 10,000uF smoothing capacitor in this power supply. The usual design ‘rule of thumb’ is 2,500uF per amp, so 4700uF would be OK. However, more is better, and besides, I had this larger capacitor on my shelf along with all of the other parts. All told, this power supply probably cost me less than $US2! And that was because I didn’t have the LM7912 in my parts bin.
The audio system transformer has a copper band around the outside of the windings, and that effectively prevents the induced hum problem noted with the cheap charger transformer.
The LEDs were in the original charger, and the charger’s PCB, complete with LEDs and front panel which matched the LEDs, was reused. It was arranged in a very similar manner to that shown in the schematic. I chose not to change this, although I think there is some benefit from relocating the red LED to the actual output of the power supply.
As it stands, with my transformer, the green LED acts as a current indicator. Why? Because, on current peaks, the DC input to the regulator falls below the voltage required to keep the combination of the 12V zener diode and 2V green LED fully conducting. It dims nicely at about 2A, and goes out at about 2.5A, giving me effectively a cheap current meter!
I also had to add a higher rated bridge rectifier to suit my new transformer, using diodes also salvaged from older equipment, and I added the slow blow fuse to the original charger PCB in place of the original, unwanted, glass-encapsulated thermal breaker. All quite easy to do.
Operation
In service, the power supply worked really well. It’s easily capable of powering the KN-Q7 QRP transceiver. The heatsink/metalwork is probably too small for heavy duty ‘rag-chewing’, i.e. lengthy conversations with the KN-Q7, but it seems fine for my typical two to four minutes of chat followed by a similar period of listening to the other guy. If you plan to talk longer than this, then use a metal box for the power supply and bolt the 2N3055 (or similar) to the chassis.
A Switch mode 12V Power Supply
I actually started out building a lightweight switched-mode power supply (SMPS) first. Elsewhere on my website, you’ll see that I have some experience at modifying those sorts of power supplies. A SMPS like this is ideal to take on holiday because they are so light.
However, they can generate a lot of RF noise. And that proved to be a problem with the one I first tried to use. After adding lots of extra filtering and getting nowhere, I tossed it aside and went to find another one. I visited a recycling center in my town, and bought an old laptop switch mode power supply. It was from a Toshiba computer, and cost me about $US3.
The most difficult task was to carefully break apart the plastic power supply shell. This can be done by carefully easing the two halves of the shell apart using a small screwdriver. Take care not to damage any internal parts during the process.
The copper shielding was temporarily removed. The only modification required was the addition of a tiny 1/8th watt resistor in parallel with one of the voltage setting resistors around the TL431 in the original power supply. The value was chosen after calculating the approximate value I needed based on the TL431 specifications and the values noted in the original power supply. You can see this in the photo below. It's the tiny resistor in the upper center of the picture.
After testing, the copper shield was replaced and the plastic shell glued together again. This modification was very successful, and the result can be seen in the photos.
Using Computer Headsets with the KN-Q7
This turned out to be one of the easiest modifications you can do to the KN-Q7. A standard PC headset used for Skype and similar services usually features a pair of stereo headphones, typically 32 ohms impedance, and a boom microphone. All of the ones I tested were electret types.
I had one in my workshop with only one headphone (to allow you to still hear people talking to you without having to remove the headset) and that was the one I used here. I think it cost me perhaps $US2, and it's pictured to the right. These are often very cheap now days.
Although the microphone connects using a stereo connector, in fact the microphone is simply connected in common to both left and right hand connections.
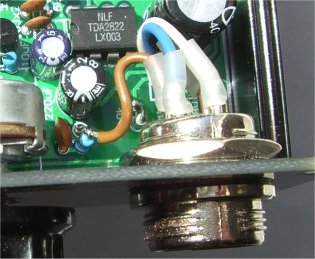
I removed the headphone and microphone stereo phono jacks from the headset. The microphone wiring was connected directly to the microphone pin and ground pin on the front panel microphone connector of the KN-Q7.
To allow me to connect the headphone connections to the speaker output of the KN-Q7, I needed to add a wire to connect the speaker output of the radio to a spare pin on the same front panel connector. Easy! I added a short brown wire from the top of the 10 ohm resistor (R12 on my schematic of the radio, which you can download from here) and that's all that was required. (It can easily be removed if you want to restore your KN-Q7 to original)
The wiring is shown in the photo opposite.
The last step was to add a pushbutton for Push To Talk (PTT) It's the white wire you can see in the photo, and the PTT switch can be seen in the photo above at the end of a short section of grey cable.


Related Links
Downloads
12V 2A Linear Power Supply - Link
|
|
|
| |
Accurate LC Meter
Build your own Accurate LC Meter (Capacitance Inductance Meter) and start making your own coils and inductors. This LC Meter allows to measure incredibly small inductances making it perfect tool for making all types of RF coils and inductors. LC Meter can measure inductances starting from 10nH - 1000nH, 1uH - 1000uH, 1mH - 100mH and capacitances from 0.1pF up to 900nF. The circuit includes an auto ranging as well as reset switch and produces very accurate and stable readings. |
|
PIC Volt Ampere Meter
Volt Ampere Meter measures voltage of 0-70V or 0-500V with 100mV resolution and current consumption 0-10A or more with 10mA resolution. The meter is a perfect addition to any power supply, battery chargers and other electronic projects where voltage and current must be monitored. The meter uses PIC16F876A microcontroller with 16x2 backlighted LCD. |
|
|
|
60MHz Frequency Meter / Counter
Frequency Meter / Counter measures frequency from 10Hz to 60MHz with 10Hz resolution. It is a very useful bench test equipment for testing and finding out the frequency of various devices with unknown frequency such as oscillators, radio receivers, transmitters, function generators, crystals, etc. |
|
1Hz - 2MHz XR2206 Function Generator
1Hz - 2MHz XR2206 Function Generator produces high quality sine, square and triangle waveforms of high-stability and accuracy. The output waveforms can be both amplitude and frequency modulated. Output of 1Hz - 2MHz XR2206 Function Generator can be connected directly to 60MHz Counter for setting precise frequency output. |
|
|
|
BA1404 HI-FI Stereo FM Transmitter
Be "On Air" with your own radio station! BA1404 HI-FI Stereo FM Transmitter broadcasts high quality stereo signal in 88MHz - 108MHz FM band. It can be connected to any type of stereo audio source such as iPod, Computer, Laptop, CD Player, Walkman, Television, Satellite Receiver, Tape Deck or other stereo system to transmit stereo sound with excellent clarity throughout your home, office, yard or camp ground. |
|
USB IO Board
USB IO Board is a tiny spectacular little development board / parallel port replacement featuring PIC18F2455/PIC18F2550 microcontroller. USB IO Board is compatible with Windows / Mac OSX / Linux computers. When attached to Windows IO board will show up as RS232 COM port. You can control 16 individual microcontroller I/O pins by sending simple serial commands. USB IO Board is self-powered by USB port and can provide up to 500mA for electronic projects. USB IO Board is breadboard compatible. |
|
|
|
|
ESR Meter / Capacitance / Inductance / Transistor Tester Kit
ESR Meter kit is an amazing multimeter that measures ESR values, capacitance (100pF - 20,000uF), inductance, resistance (0.1 Ohm - 20 MOhm), tests many different types of transistors such as NPN, PNP, FETs, MOSFETs, Thyristors, SCRs, Triacs and many types of diodes. It also analyzes transistor's characteristics such as voltage and gain. It is an irreplaceable tool for troubleshooting and repairing electronic equipment by determining performance and health of electrolytic capacitors. Unlike other ESR Meters that only measure ESR value this one measures capacitor's ESR value as well as its capacitance all at the same time. |
|
Audiophile Headphone Amplifier Kit
Audiophile headphone amplifier kit includes high quality audio grade components such as Burr Brown OPA2134 opamp, ALPS volume control potentiometer, Ti TLE2426 rail splitter, Ultra-Low ESR 220uF/25V Panasonic FM filtering capacitors, High quality WIMA input and decoupling capacitors and Vishay Dale resistors. 8-DIP machined IC socket allows to swap OPA2134 with many other dual opamp chips such as OPA2132, OPA2227, OPA2228, dual OPA132, OPA627, etc. Headphone amplifier is small enough to fit in Altoids tin box, and thanks to low power consumption may be supplied from a single 9V battery. |
|
|
|
|
|
Arduino Prototype Kit
Arduino Prototype is a spectacular development board fully compatible with Arduino Pro. It's breadboard compatible so it can be plugged into a breadboard for quick prototyping, and it has VCC & GND power pins available on both sides of PCB. It's small, power efficient, yet customizable through onboard 2 x 7 perfboard that can be used for connecting various sensors and connectors. Arduino Prototype uses all standard through-hole components for easy construction, two of which are hidden underneath IC socket. Board features 28-PIN DIP IC socket, user replaceable ATmega328 microcontroller flashed with Arduino bootloader, 16MHz crystal resonator and a reset switch. It has 14 digital input/output pins (0-13) of which 6 can be used as PWM outputs and 6 analog inputs (A0-A5). Arduino sketches are uploaded through any USB-Serial adapter connected to 6-PIN ICSP female header. Board is supplied by 2-5V voltage and may be powered by a battery such as Lithium Ion cell, two AA cells, external power supply or USB power adapter. |
|
200m 4-Channel 433MHz Wireless RF Remote Control
Having the ability to control various appliances inside or outside of your house wirelessly is a huge convenience, and can make your life much easier and fun. RF remote control provides long range of up to 200m / 650ft and can find many uses for controlling different devices, and it works even through the walls. You can control lights, fans, AC system, computer, printer, amplifier, robots, garage door, security systems, motor-driven curtains, motorized window blinds, door locks, sprinklers, motorized projection screens and anything else you can think of. |
|
|
|